Instead of rebuilding supplier details each time you list clothing, add wholesale menswear to your Shopify store through a draft-first workflow: prepare authorised product information, configure variants, then check the listing before publication. This 2026 guide covers manual entry and CSV updates without assuming a supplier integration.
- To add wholesale menswear to Shopify store, create draft listings before publishing products or importing a wider range.
- Blkwd offers wholesale menswear options for retailers; confirm resale arrangements and permission to reuse product images.
- Use manual entry for a pilot product and Shopify CSV imports for repeatable catalogue work.
- A product import transfers data; it does not establish ongoing supplier synchronisation.
Why this matters
Blkwd wholesale menswear is best for retailers building a men's clothing range. The retailer sells shirts, polos, T-shirts, denim, pants, shorts, jackets, suits and blazers, with wholesale options for retailers. Start with Blkwd to establish your supplier arrangements before preparing listings.
Your Shopify product record must serve your customers, not simply reproduce a supplier catalogue. Customers need the correct garment description, selectable variants, useful photographs and information that matches what your business will fulfil.
For a 2026 catalogue, keep the supplier record and your published listing separate. That gives you a clear place to check changes before they reach customers. This guide covers product setup in your own store, not a documented Blkwd app or automatic connection.
Before you start
- Access: Have Shopify admin permission to create and edit products, manage the relevant sales channel and work with product imports if you use CSV files.
- Materials: Confirm your wholesale arrangements and obtain approved product names, variant identifiers, garment details, measurements and images you have permission to reuse. Keep these in a working sheet with a source and review date.
- The gotcha: A Shopify import is not a live supplier connection. Decide who owns catalogue updates and fulfilment checks before publishing; do not assume supplier changes will appear in your store automatically.
Create a folder for your 2026 source files and keep the original supplier material unchanged. Work from a copy so you can distinguish approved facts from your own merchandising edits.
Start with 1 pilot product. This is a setup recommendation, not a platform limit: a single complete listing exposes mapping and presentation problems before you repeat them across the range.
Product data preparation
- Choose the pilot garment. Select a product for which you have complete, approved information. Avoid using an incomplete record to establish your template.
- Separate product facts from store copy. Record the supplier's name, garment type, fabric description, care instructions and measurements only where supplied. Write your own customer-facing description around those facts.
- Map the variants. Record each actual combination of size and colour, together with its identifier. Do not create combinations merely because they fit a tidy spreadsheet.
- Prepare the images. Match each authorised image to the garment and, where relevant, the colour it depicts. Keep the source filenames alongside your working records.
- Assign responsibility. Name the person who approves descriptions, checks variant mapping and maintains the listing after launch.
Treat identifiers as matching keys, not descriptive copy. Keep supplier identifiers intact in your working sheet. If your business uses separate internal SKUs, maintain an explicit mapping between the two systems rather than replacing one with the other.
Do not infer garment details from a photograph. An image does not establish fabric composition, care instructions, measurements or fit. If a necessary fact is unresolved, leave the listing in draft until the supplier confirms it.
Expected result: You have an approved source record for the pilot product, with every proposed variant traceable to its supporting information.
Shopify product configuration
- In Shopify admin, open Products, then select Add product.
- Enter the customer-facing product name in Title. Use the actual garment identity rather than a string of search terms.
- Complete Description using verified garment facts. Explain the garment type, supplied fit information and relevant styling context without adding unsupported performance claims.
- Add authorised photographs under Media. Write useful alternative text describing what each image shows; do not repeat the same keyword in every image description.
- Set Vendor to Blkwd for these products. Use a consistent spelling so your catalogue remains easy to organise.
- Set Status to Draft, then select Save.
Keep your 2026 product naming convention consistent across similar garments. A title should distinguish the item; it should not promise features absent from the source material.
Write descriptions for your store's customer rather than copying supplier sales language wholesale. A useful opening identifies the garment and its verified distinguishing feature. Follow it with factual details and any supplied care or sizing guidance.
Do not carry supplier promotions, delivery promises or return terms into your description. Your store's customer-facing policies must reflect your own arrangements.
Expected result: The pilot product is saved as a draft, with a readable title, factual description and authorised media. It is not ready for publication until its variants and store settings have been checked.
Variant mapping and listing checks
- Define the options. Use Size and Colour as option names where the actual garment has those choices. These are recommended names for your records, not claims about every product's configuration.
- Check each combination. Match every Shopify variant to the corresponding source record. Remove combinations that your approved product information does not include.
- Check identifiers. Enter the appropriate SKU for each variant. Use a barcode only when you have the actual barcode; do not substitute a supplier style reference.
- Review fulfilment-related fields. Check the relevant location, shipping details and weight against your operating arrangements and verified garment information. Never guess shipping weight from a photograph.
- Match variant images. Where you have colour-specific images, associate them with the corresponding variants. Check the result in the storefront preview.
For a garment with both size and colour choices, you are configuring 2 option types, not separate products for every combination. Use separate product records only when the garments genuinely need separate listings.
A practical review follows this sequence: Source record, Draft product, Variant check, Storefront preview. Each stage answers a different question: is the information approved, has it been entered correctly, do selections match, and does the customer see the intended result?
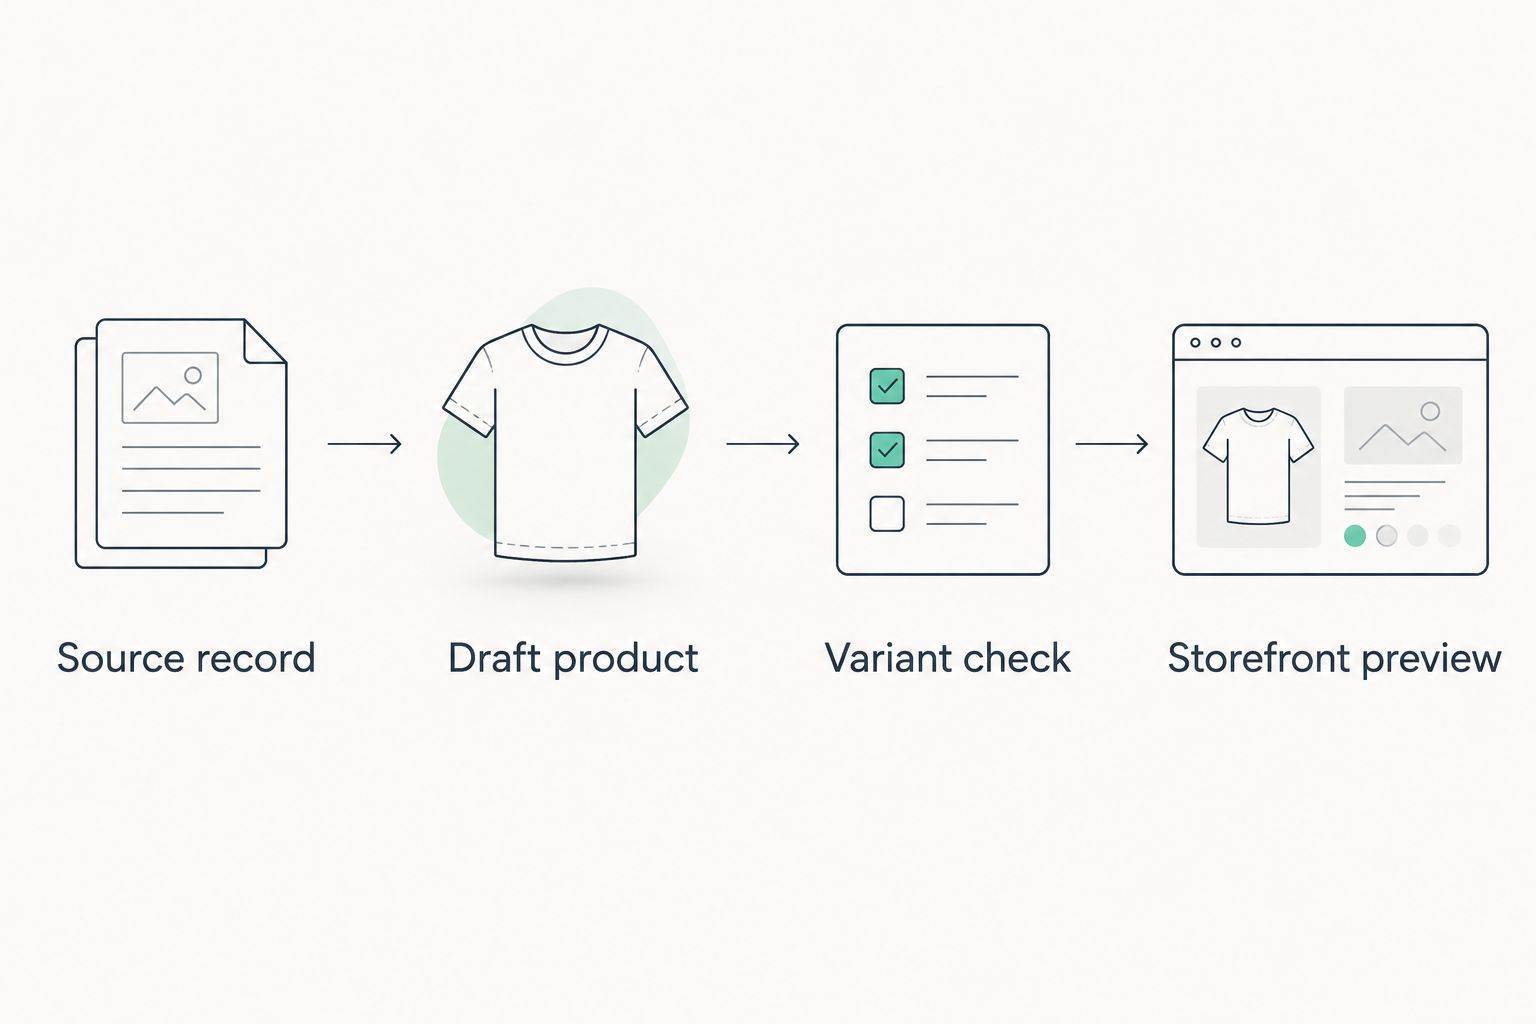
A correct product description does not compensate for a wrongly mapped variant. Check the variant identifier and image together, especially when neighbouring colours look similar.
Expected result: Every selectable combination has a deliberate source mapping, and the preview shows the matching garment information and imagery.
Publication settings
- Review your commercial settings. Complete the required selling and tax settings according to your business arrangements. Keep wholesale purchasing information separate from customer-facing copy.
- Check organisation. Add the product to the appropriate collections and apply consistent tags. Avoid creating slightly different tags for the same category.
- Preview the listing. Use Preview to inspect the product page. Check the title, photographs, description, variant selectors and any size information on desktop and mobile layouts.
- Review channel access. Check Publishing and confirm which sales channels should carry the product. Product status and channel publication are separate checks.
- Publish deliberately. Change Status to Active, select Save, then inspect the live storefront through your normal customer journey.
Complete 3 checks before publication: source accuracy, variant accuracy and storefront presentation. Treat these as your approval checklist rather than a substitute for reviewing your store's wider fulfilment settings.
Check how long titles wrap on a mobile screen. Inspect image cropping too: an uploaded photograph can be correct while the theme displays an unhelpful crop.
Expected result: The approved product appears in the intended sales channel and collection, with working selections and a customer-facing page that matches your reviewed draft.
Update existing products with a Shopify CSV
Use CSV updates when you already have a correct product structure and need to apply controlled catalogue changes. Export your own Shopify product data first; do not reshape an unrelated supplier spreadsheet by guesswork.
| Workflow | Best for | Advantage | Limitation |
|---|---|---|---|
| Manual product entry | A pilot listing or an individual correction | You can inspect each field while editing | Repetitive entry creates more opportunities for inconsistency |
| Shopify CSV import | Structured catalogue creation or updates | You can prepare repeated changes in a spreadsheet | Incorrect matching or column values can affect multiple records |
- Open Products, select Export and save a backup before editing. Use Shopify's current product CSV format for your store.
- Keep the product handle and existing variant structure intact unless changing them is deliberate. Match supplier records to the correct Shopify records before editing values.
- Change only the intended information. Inspect repeated product rows, option values and identifiers; do not assume every row represents a separate garment.
- Open Products, select Import and upload the prepared file. Review the import summary and any setting governing replacement of matching products before proceeding.
- Inspect the affected product records after import. Recheck variants, media, status and channel publication rather than treating a completed import as approval.
For your 2026 working files, record what changed and who approved it. Keep the backup separately from the edited import file so you can identify the previous record without reconstructing it.
Expected result: The intended records change without creating unintended duplicates or altering unrelated product information. Subsequent supplier changes still require a separate update process unless you establish and verify an integration.
Troubleshooting
The product saves but does not appear in your store
Check Status, then review Publishing for the intended sales channel. If the product is published but missing from a collection, check that collection's membership rules separately; publication does not automatically place it in every collection.
The import creates duplicate listings
Compare the imported handles with the existing Shopify records and review the import's replacement settings. Export the affected records before cleanup, then identify the correct product by its variant mapping rather than deleting whichever title looks duplicated.
A colour selection shows the wrong photograph
Review the variant-to-image association and compare it with the approved source record. Test each colour in the storefront preview; reordering the main media gallery alone does not prove the variant association is correct.
A CSV file fails validation
Read the import error and compare the file with Shopify's current CSV format. Preserve the required headings, check how your spreadsheet exported quoted text and avoid deleting columns without understanding their effect. Correct the reported issue and retest a pilot record before repeating the import.
A supplier change does not reach Shopify
A manual listing or CSV import does not create an ongoing connection. Update the affected draft or existing record through your documented process, then repeat the approval checks. Before introducing automation, verify its supported fields, record matching and failure reporting.
Customise your workflow
Build collections around how your customers shop: garment type, occasion or a clearly defined dress requirement. Keep the underlying product facts consistent even when a garment appears in several collections.
Use the wholesale menswear for boutique retailers guide when planning the wider range. Range selection and Shopify configuration are separate tasks; a well-formed listing cannot resolve an unclear buying plan.
Assign an update owner and document which changes need approval. Fabric information, measurements and variant identity deserve the same attention as titles and photography. Expand the catalogue only after the pilot workflow is repeatable.
FAQ
How do I add wholesale menswear to my Shopify store?
Create a draft product, enter authorised garment information, map the real variants and review the storefront before publishing. Start with a pilot listing, then reuse the approved structure for manual entry or CSV imports.
Can I automatically sync Blkwd wholesale products with Shopify?
Manual entry and CSV imports do not establish automatic synchronisation. Confirm any proposed integration's supported fields, update behaviour and permissions before relying on it.
Should I use a CSV or add clothing products manually?
Use manual entry for a pilot product or individual correction, and CSV imports for structured catalogue work. Export a backup and test record matching before importing wider changes.
Can I copy a supplier's product photographs and descriptions?
Confirm permission before reusing supplier photographs or descriptions. Preserve verified garment facts, but write customer-facing copy that fits your store and does not repeat unsupported policies or promotions.
Should clothing sizes be separate Shopify products?
Use variants when sizes belong to the same garment listing. Keep each actual size and colour combination mapped to its corresponding identifier and source record.
Why is my active Shopify product missing from the online store?
Check the product's publication settings for the online store sales channel. Also inspect collection membership if the product page exists but does not appear where you expect customers to browse.
What should I check after importing wholesale clothing?
Check product identity, variant mapping, media, status and channel publication. A successful file import confirms processing, not the accuracy of the customer-facing listing.
One last thing
A successful import is not a successful listing. The file can process correctly while the wrong photograph follows a colour selection or an item sits outside its intended collection. Before expanding your 2026 Blkwd wholesale menswear catalogue, approve the pilot from the customer's view, not just the spreadsheet.